For someone who likes to write, I didn’t blog here a lot over the last 2 years. I logged into the wp-admin now and then, gasp at the number of spam comment that have piled up, maybe add or update a draft or two, then then let my session expire. Maybe it’s because I write a lot at work? Or maybe I don’t think I have much to share with the world at large? It’s hard to say.

Clackity clack
One thing is for sure, though. This site did not accurately reflect who I am professionally and drawing any additional attention here recently felt disingenuous at best. I’m not a “WordPress guy” anymore and I’m not a freelancer either. The things I’ve built in the past are not the same things I’m building now. I don’t need a place to “showcase my work,” that’s what GitHub does for me these days.
I wanted to get away from plugin updates, core updates, spam comments, logins, themes, and everything else that was such a large part of my life as a developer for so long. I started to think about what I really needed out of my site:
- It needs to be a place for my writing. I love to write and I want to put more of what I write out there. The next-generation editor in WordPress, Gutenberg, is way more than what I need. I want to write in Markdown, commit it, and be done.
- It needs to be a place for other creative stuff. I need the liberty to mess around with something outside of the box and be able to just toss it online. Right now my options are a subdomain (annoying to maintain) or a custom page template with a DB record just for the URL.
- It needs to be dead-simple for me to maintain and change. I want minimal dependencies, easy script deployment, no cache needed, no sudden problems.
After some digging, some grand plans, and then just wanting it to be done already, I landed on SSG, or static site generation. If you're not familiar with this family of technology, it's basically a bunch of pre-processing that starts with some kind of file and outputs HTML. So you get all the benefits of flat HTML files (performance, security, easy deployment) without the headache of maintaining all the directories and boilerplate code.
There are a number of SSG options out there but the one I kept coming back to over and over was Eleventy. I started digging through the documentation (which is fantastic) and found a number of killer features I definitely knew I wanted:
- Multiple templating languages
- Easy permalink handling
- Collections of data based on tags
- Shortcodes
- Great meta data handling
It's possible that another SSG can do all of the same stuff but the way it came together just made sense. And the docs site is kind of silly and I like it when technology doesn't take itself too seriously!
Getting to know Eleventy
I needed to convert all of my WordPress content to Markdown at some point but I wanted to get to know Eleventy a little better first.
I knew that I would need:
- Some kind of base HTML frame that would handle the header, footer, and JS/CSS
- Layouts for each of the various post and page types I have (not many)
- Markdown for the main content with somewhat involved metadata pulled from WordPress
I figured the best way to handle this is to define a layout alias for each of the types that would come out of WordPress and then give them each their own template (explained in the Eleventy structure > Templates section below). Then I could create a post like this:
---
layout: post
---
... and it would be clear what the template hierarchy is:
post.md > layouts/post.njk > _html.njkI'm using Nunjucks for the first time here. I like that it's from Mozilla, a lot of it looks familiar, and I'm not really expecting to do a lot in the templating engine itself. If I need to do something really different than the structure I have, it will likely be in plain HTML.
Using this combination, I had a sample Markdown page compiling through the template hierarchy to HTML without issues in under an hour! Everything just worked, configuration was really simple, and the defaults were all sane. I wrote a few npm scripts to simplify things and start looking at converting the WordPress content over.
One thing I learned after some flailing around is that Eleventy ignores everything in your .gitignore so when I added a directive to keep the content MD files out of the repo, it said that that processed 0 files. I just had to modify the Eleventy config and I was back in business:
// .eleventy.js

module.exports = function(eleventyConfig) {
	eleventyConfig.setUseGitIgnore(false);
	// ...
};
WordPress to Markdown
I was really looking forward to this part. I have done a number of migrations to, from, and within WordPress using custom WP-CLI scripts and it's an interesting exercise to try to handle all the different edge cases that come up.
The conversion here breaks down into 2 parts:
- The metadata, or "front matter", which is used in parts of the template and in collections of content.
- The page or post content itself, which is mainly the partially formatted
post_contentfield from the database but could also include metadata that is output in the WP template files.
Before I get too far into the explanation here, I should point out that I published the WP-CLI script I used. The walk-through below is the thought process I went through to get there in case you wanted to write your own script or modify mine for your purposes.
What to get
What you pull out of your WordPress database and convert will depend on how your site was built. I used the following query:
$get_post_args = [
	// Get everything ...
   'posts_per_page' => - 1,
   /// ... that is a page or a post ...
   'post_type'      => [ 'post', 'page' ],
   // ... regardless of publishing status ...
   'post_status'    => 'any',
   // ... and sort it oldest to newest.
   'orderby'        => 'date',
   'order'          => 'ASC',
];
The posts_per_page needs to be set to -1 (get everything) but can be adjusted if you're testing out the conversion. The post_type needs to be set so you exclude attachment types (uploads) but should be expanded to include others that you might be using. If you've had the site up for a while and mutliple people have worked on it, there might be types there that you've forgotten about!
If you're using my WP-CLI script, you can run
wp wptomd-typesto output all of the post types in your database.
As you're taking inventory of what's there, it might be time to start looking at your WP theme files as well to see if there is any content being output from custom fields/postmeta. Look for get_post_meta() in theme files to figure out what fields are used and how. You'll want to figure out early whether these need to go in data fields (these can be used in listings and outside of the MD file) or above/below the main content.
I had a few extra fields I wanted to keep:
- Links to external sites (I put this in a
link_todata field in Markdown) - Quote attribution for special post formats (I added this below the post content, which contained the quote)
- SEO plugin metadata (meta title was added to a data field and the meta description replaced the post excerpt)
Metadata
I started with the metadata section to get more of a feel for Eleventy's built-in data handling. There are a number of data fields that Eleventy uses internally, all of which are listed here. There were a few other fields that I wanted to use in templates and listings as well.
permalink
This is an important one to get right as I wanted to keep as many of the existing URLs as possible without redirects. I also wanted a file naming and organizing scheme that could be different than the URL. To that end, I used the post_name field from the posts table.
As I was trying out the conversion process, I realized that I was pulling all posts and pages of any post status. There were a few that were pending or draft that I wanted to keep but didn't want to be published. It turns out, you can set permalink: false and an output file is not created.
I also noticed that some non-published content was not given a post_name and, when converted, would create a MD file with no name (several, in fact, so they would be over-written). It was easy enough to just use the post_title field and convert with sanitize_title().
Finally, in order to generate HTML files that would load on the same URL, I needed to append /index.html. Without that, text files with no extension were being created.
Here's where I landed with the permalink:
foreach( $posts as $post ) {

	// Change the object so it can be used later.
	if ( empty( $post->post_name ) ) {
		$post->post_name = sanitize_title( $post->post_title );
	}

	$meta = [
		// If it's published, set the URL; if not, no output file.
		'permalink' => 'publish' === $post->post_status ?
			$post->post_name . '/index.html' :
			'false',
	];
}
I originally defined the permalink in each post and page file but found that this was duplicating what I was using in my file names so I switched to using a template data file to generate that from the file slug. See the code here.
layout
This determines what template will used when compiling. As I mentioned above, I added layout aliases to Eleventy so I could just use a word like post or page and the appropriate layout file would be used. It also makes it easy to change the file location at some point in the future and only making the change once.
I only had page and post types to migrate but I was using post formats as well. On my WordPress site, I would change the output slightly based on the format. On the Eleventy-built site, I wanted to use separate layout files for that so I converted the mix of types and formats to layout:
foreach( $posts as $post ) {

	// Anything that is a post with a format gets a value ...
	$meta['layout'] = get_post_format( $post->ID );
	if ( empty( $meta['layout'] ) ) {
		// ... then pages and standard posts fall back to type.
		$meta['layout'] = $post->post_type;
	}
}
tags
Things can get a bit confusing here as we're going to start to overlap terminology a bit between the two platforms. In Eleventy, tags are used to construct collections of content. In WordPress, tags are just a type of taxonomy with no hierarchy.
In my experience, how tags and categories are used differs from site to site. Some use tags, some categories, some both. I've used both over the years, typically leaning on categories to do the heavy lifting.
Since I didn't want to lose anything and was not using a hierarchy, I just combined the tags and categories together into tags in Eleventy. I used the term's slug so I could easily generate URLs and convert the slug to the name. If you have descriptions you want to keep, you'll probably want to generate a global data file.
The code to pull a term out and convert to the format Eleventy wants is straight-forward:
foreach( $posts as $post ) {

	// Get the post tags and normalize to an array.
	$tags = get_the_terms( $pid, 'post_tag' );
	$tags = is_array( $tags ) ? $tags : [];

	$term_names = array_map( function ( $wp_term ) {
		return '"' . $wp_term->name . '"';
	}, $terms );

	$meta['tags'] = '[' . implode( ', ', $term_names ) . ']';
}
date
I used post_date_gmt for the date field as Eleventy can handle localization of dates. I also stored post_modified_gmt in a modified field to keep that piece of data around. This means that I'm making posts with dates in GMT going forward, which I'm not wild about, but probably the best way to go about it.
The GMT date is converted to local time during the build so the HTML being output is in Pacific time, which is what I want. By default, it's about the longest date I've ever seen so I added a filter to format the date into something more manageable.
// .eleventy.js
const moment = require('moment');
moment.locale('en');

module.exports = function(eleventyConfig) {
	eleventyConfig.addFilter('dateformat', function(dateIn) {
		return moment(dateIn).format('MMM DD, YYYY [at] h:mm a');
	});
	// ...
};
Similar to the permalink, I switched to using a template data file to generate that from the file slug. See the code here.
The rest
WordPress, by default, stores a lot of additional information you can use in your posts. Beyond what WordPress does, you might have additional postmeta fields that you use, either through the default UI or through a plugin like ACF. There's two ways to handle all of this additional data:
- In the front matter fields to be used in template files
- Appended to the Markdown content
All of the extra data I had was template-level, as opposed to large chunks of text or HTML stored in fields. I have seen plenty of sites, though, that use postmeta heavily. Your best bet here is walking through the page templates and look for where get_post_meta() or get_field() is used, then figure out what to do with that field.
Here are a few pieces of data I found useful to store in the template data for output later on:
title- I pulled this straight from theWP_Postobject, passing it throughwp_strip_all_tags(), thenhtmlspecialchars(). It's probably best to apply thethe_titlefilter as well but I knew I didn't have any transformations that needed to be applied. Make sure you sure you surround the value in quotes as well, in case any YAML-unsafe characters (like colons) are there. If you use an SEO plugin of some kind, you'll want to check for any additional meta fields being used for this.excerpt- I handled this the same as the title, including surrounding quotes. The filter for this value isthe_excerpt.modified- I added thepost_modified_gmtto keep the data around. You can useLast Modifiedhere to start using the file edit date going forward.featured_img- This seemed like another good piece of data to keep around. I usedget_the_post_thumbnail_url()here, along with thethumbnailsize. If you keep all of your images in thewp-content/year/monthfolders when you launch the new site, everything should work well. Otherwise, you'll want to transform this URL to whatever new path you're using.wpid- I stored the WordPress post ID here in case I ever needed to go back and check the database for some reason.
That was everything in the template data fields. The rest was dealing with the post content.
The content
The content portion of this was far less involved for my site. Mostly everything displayed on the page was stored in the post_content field without a lot going on in filters or anywhere else. In fact, compared to the meta creation above, this was a breeze!
We want to get decent HTML to convert to Markdown so the order of operations I followed here was:
1. Pass through the the_content filter, add meta
This is definitely step 1 of the process. WordPress stores content as whatever was entered into the editor, then coverts that to viewable HTML in the_content filter. There's a lot of magic going on there, including shortcode processing, so it's best to work with the HTML post-conversion.
Depending on how your theme is setup, this might also bring in additional content at the top and bottom of the post, possibly stored in postmeta. You'll want to examine your converted content and make sure that the HTML you see on your WP-powered site is more-or-less the same as what you see in your converted Markdown files. If you're missing chunks of content, look at the theme files to see where that content it coming from. This is great reason to have a repeatable script!
2. Convert HTML to Markdown
I used the PHP League's HTML to Markdown converter, which worked on the WordPress-generated HTML with zero configuration. Install with Composer and use like so:
require 'vendor/autoload.php';

use League\HTMLToMarkdown\HtmlConverter;

$converter = new HtmlConverter();

foreach( $posts as $post ) {
	// ...
	$the_content = apply_filters( 'the_content', $post->post_content );
	$the_content_md = $converter->convert( $the_content );
}
3. Replace URLs
The next step I took was replacing URLs. This is not necessary but to make life easier developing locally, I:
- Converted
wp-contentdirect URLs to_imagesrelative ones - Converted all the other direct URLs to relative ones
This step could come before or after converting to Markdown, it should not mattter much either way.
4. Strip additional tags
Finally, I stripped all the remaining HTML with strip_tags(), keeping anything that would display well in the new template. Remember that, at this point, the content is converted to Markdown so the remaining tags are just ones that could not be converted.
You'll want to be careful here as you can potentially lose layout that you want to keep. Since strip_tags() lets you indicate what you keep, instead of what you want to remove, you'll need to be explicit. I processed the content through once without the tag stripping, then searched the processed content for the first part of a closing tag:
❯ grep -H -r "</" ./content/mdThat found a number of ones I wanted to delete, like <figure> and <figcaption> used for images, and ones I wanted to keep, like <span> tags with styling. I ended up stripping the Markdown like so:
$the_content_md = strip_tags(
	$the_content_md,
	'<a><span><object><param><embed><del>'
);
Create the file
At this point, you should have an array of template data and a chunk of content that need to be combined into a .md file. The format of the Markdown file should be about like so:
---
title: post_title
layout: post_type
---

converted post_content
Once you have the content in a string and ready to save, you'll need to generate a file name, find a place to output it, and see what happens next. I used the post name appended with .md and output to a temporary directory a few times before I started outputting into my Eleventy file structure:
$fh = fopen( '~/path/to/dir/' . $post->post_name . '.md', 'w+' );
fwrite( $fh, $the_content_md );
fclose( $fh );
First Run
I tied this whole process into a WP-CLI script to make this easy to run multiple times. I figured this would need a lot of tweaking so having a reliable way to make changes and see the output made a world of difference.
The best way I found to have a quick iteration cycle was to output the Markdown files into the folder where Eleventy is watching so the processing happens right after the conversion run.
On your first (or second or 100th) run, you might find a number of things to tweak:
- You might want to exclude certain pages
- You might find tags or categories to remove
- You might adjust your file name
- You might find addition DB-stored content to include
- You might figure out additional content conversions you want to make
- You might change the directory structure of what you output
... and you might hit a lot of errors in Eleventy as you figure out how the templating language and data cascade works. This is completely fine and part of the process! I probably ran the script 40-50 times before I had the output I wanted to keep.
The trick here is to "let the robots do their job." In other words, don't start manually adjusting any of the content in the Markdown before you're sure all the repetitive stuff has been taken care of. I was running this on a local copy of my site so if I wanted to delete a tag or adjust a permalink on a single post, I would make that change in the WP database, then keep running the script to make changes. In fact, I'm probably 95% done with the site at this point of the post and I just started making manual changes and corrections (tag curation, spelling/URL errors, etc).
Using my sample Eleventy repository (which is all of the configuration I'm using minus my content, CSS, and HTML) and the WP to Markdown WP-CLI script I made (the basic script plus some of the filters in filters/ are what I used for my conversion), it looks a bit like this:
❯ cd ~/path/to/eleventy
❯ npx @11ty/eleventy --serve --watch


❯ cd ~/path/to/wp/site
❯ wp wptomd ~/path/to/eleventy/content/md
'Output dir: ~/path/to/eleventy/content/md'
Processing: Post Title
Filename: post/post-name.md
Success: Processed: XX


Writing _dist/post-name/index.html from ./content/md/post/post-name.md.
Copied 1 item / Wrote XX files in 3.50 seconds (4.6ms each, v0.10.0)
Watching…
... or some error that needs correcting. You should be able to make changes to your Eleventy templates and see new output or change the processing script, run wp wptomd again, and see the output there. If you leave your local site open in your browser, it will even live reload so feedback on what you're doing comes quickly!
I'll say here ... making changes in any part of this pipeline and having my browser reloaded with the changes by the time I got back to the window is what really made love this process! There are a lot of moving pieces but you get used to where things are (and should be) stored fairly quickly. I had a Sass processor running at the same time so I could make minor styling changes and have the compiled CSS carried over by Eleventy as well. Very powerful.
Eleventy structure
So far, I've been concentrating on the WordPress side of things. Eleventy is really well-documented and a lot of what you'll want to do here depends on your site.
Still, there are a number of things we did above that will affect how the templates come together so I'll cover the configuration and structure that I used, which is stored in the sample repo here. This repo includes all of the template files and configuration that I use, plus Markdown content that was created by importing the WP theme unit test file into a clean install of WordPress. I ran my WP to Markdown CLI script, made a couple of changes:
- The "Markup: Title With Special Characters" post was not playing nicely with YAML so I removed the backslash
- I changed the
page/front-page.mdtopage/home-page.mdand changed thepermalinkmeta to/index.htmlso there would be a home page - I copied the
wp-contentdirectory into the_distoutput directory so the images appeared correctly
... and then ran Eleventy. With those small changes above, the site was built and served without a problem! See the README in that repo for more details about how to run this site locally and below for specifics on the Eleventy structure.
Markdown
All of the markdown is stored in content/md (GitHub) so I can output the convertor script to an isolated location. Eleventy builds or copies everything of a particular format that's located the content directory. All of this is determined in the configuration file. The object that is returned below is a specific format to indicate where the content should come from - dir.input - and where it should be processed to - dir.output. The setTemplateFormats() call tells Eleventy what to look for. The md files are processed and the css ones are just passed through.
// .eleventy.js
module.exports = function(eleventyConfig) {
  // ...
  eleventyConfig.setTemplateFormats([ 'md', 'css' ]);

  return {
    dir: {
      input: "content",
      output: "_dist"
    }
  };
};
Each of the Markdown files was given a permalink meta set to something like the-post-name/index.html from the CLI script. This means that the final URL is explicit and does not rely on the folder structure. Without that field, a /content/post/post-name.md file would be served from xyz.com/post/post-name/index.html.
Templates
In the Markdown file, you indicate what template you want to use with a layout meta field. This can be a path to a file, relative from the template includes directory (defaults to _includes inside the input dir), or you can set it to an alias, like we did in the script above. Those aliases need to map to template files, and that's done in the config file:
// .eleventy.js
module.exports = function(eleventyConfig) {
  // ...
  eleventyConfig.addLayoutAlias('page', 'layouts/page.njk');
  eleventyConfig.addLayoutAlias('gallery', 'layouts/gallery.njk');
  eleventyConfig.addLayoutAlias('link', 'layouts/link.njk');
  eleventyConfig.addLayoutAlias('post', 'layouts/post.njk');
  eleventyConfig.addLayoutAlias('quote', 'layouts/quote.njk');
  // ...
};
You might remember that we mapped post type and post format to the layout so we'll need to have an alias set up for each type. Without that, you'll get an error about a non-existent layout:
> You’re trying to use a layout that does not exist: page (undefined)That covers the WP-generated content but I added a few other helper templates to assist with navigation:
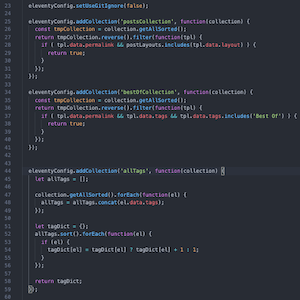
- I added an all posts listing that displays all posts for all time. You can see in that template that I'm iterating through a
collections.postsCollectionobject which I created usingeleventyConfig.addCollection. The Collections part of Eleventy is a powerful tool that lets you make new, well, collections of posts, metadata, tags, etc. I found it to be a fascinating way to work with content, as opposed to the DB-stored model that I'm used to. - I also added an all tags listing that outputs all the tags that are associated to content, linked to a tag archive page (see below) and including a count of all posts. I used another custom collection for that, which took me a while to get right but, again, was a really interesting expansion of how I viewed a bunch of stuff I've written and tagged.
- Finally, I used this article to build out tag pages using pagination. I have not fully wrapped my head around pagination and what's it's capable of doing but I got it working, the templates make sense, and that's all I need for now!
All of the various pages extend a base html template file that is all the repeating framework around the content.
Last but not least, I followed the syntax highlighting docs and had that working with the sweet theme you see here in about 5 minutes. How can you beat that?!
Impressions
I'll say now, if it was not yet clear, I'm overjoyed with how this project turned out! I was hoping for a nice, low maintenance way to write in Markdown and publish without too much trouble. What I got was a powerful and intuitive way to create, edit, combine, aggregate, and extend what I was already doing. The stack feels modern, I rarely got stuck for more than a few link clicks, and I can't believe how much I've gotten done. Between this post, the WP-CLI script, the Eleventy config and templates, and a ton of clean-up, I'm about 4 full days in total. 🤯
There are a lot more gains than just productivity, though:
- Writing, saving, and waiting a second or so for the browser to magically refresh, whether I'm in an Markdown file or a Sass one (with
node-sass --watchin the background) is a fantatic way to work. - The speed at which the site loads is really something to behold. Coming from WordPress, where a site 5x slower than this is a badge of honor, this is glorious.
- Defining the meta in the post, processing that into collections, then working with it in templates was a big change in paradigm but I'm really getting into it. Before, everything you need was stored and managed. Now, you make what you need on the fly and, when it's done, there is no artifact.
- In a similar vein, this idea of running an async action like hitting an API or processing content during the build instead of with client-side JavaScript feels like a whole new world to me. I can imagine importing lists from WorkFlowy, pulling down collections of Tweets, etc.
... and still more as I work with it more and more.
I would highly recommend trying this out if you're just getting started with a blog or are getting tired of logging in, updating plugins, clearing out spam comments, and updating core before you get down to writing. WordPress has it's place but, in terms of writing and enjoying it, Eleventy has my ❤️
< Resources / References >
- This blog on GitHub
- My WP-CLI script to convert your WordPress content to Markdown
- Eleventy project built from the WP Theme Unit Test content
- A fine post by @efjspencer about a difference approach to the same problem
- WP-CLI Commands Cookbook
- Run-down of the data cascade in Eleventy - this is one of the most confusing things to learn in Eleventy and this post does a great job of laying it all out.
< Take Action >
Comment via:
Subscribe via:
< Read More >
Tags
Newer
Apr 04, 2020
A Moment in Time During the Pandemic
The first time things started getting real for me during this Coronavirus pandemic was at the end of February. The pandemic, however, had already started.
Older
Jan 15, 2020
Notes from Rock Your Code Reviews with Dr. Michaela Greiler
I attended a great webinar led by Dr. Michaela Greiler on code reviews. I had my own opinions going in, of course, but I learned a lot and had a number of questions that I had (and didn't know I had) answered.