👋 I'm curently looking for a new role. Hire me!
As internet connection speeds get faster and video file sizes get smaller, we’re seeing more and more on-screen training for products and processes that typically would only have a written manual (or nothing at all). This videos are an excellent way to learn a product, especially if you have trouble reading text on a screen or get bored easily. Additionally, videos provide another ‘visual’ layer for people who learn that way.
I recently had my first experience with Lynda.com watching some of their free videos on Illustrator. After watching only a couple of them, I was totally sold. I’m also in the process of making a series of videos showing people how to use a certain functionality of a software program I’m working on. Working with both the consumption end (watching) and production end (making), I’ve learned quite a bit about what works and what doesn’t when recording these on-screen videos. I’ve also learned that they are a lot harder to make than they look.
I want to share a few tips that a colleague and I came up with while making these videos. For reference, we’re using the Camtasia 5 software to record and edit the videos. While it isn’t perfect, there isn’t too much more to ask for and I’m not considering a different solution at the moment. Thanks to Mark Otis for a few of these ideas.

What’s the point?
Video training is a great way to show complicated steps or describe potentially confusing theories. Video training, however, is not great for short, easy tasks. If I wanted to show someone how to recover a file from their recycle bin, it is easier to simply say “open the recylce bin, find the file, drag out of the recycle bin” than it is to make a video.
The point being that not everything lends itself to being taught in a video format. To make a successful video, be sure to think about it from the student’s perspective. Do they gain anything by seeing it on a screen? Are there complicated steps that work better shown than told? Even better, do these types of videos already exist out there? Before you start, it might be a good idea to run a quick Google or Youtube search for your subject matter.
Start with an outline
Off-the-cuff demonstration is VERY difficult to pull off properly. By that I mean it’s pratically impossible to effective teach people without a guide to tell you what is next. Watch a presentation without a clear, concise outline or a script and you’ll notice that the presentation jumps around, misses topics, and ends up somewhat to extremely ineffective.
Even if the video is short, have precise steps to take on-screen available and print out or write down the points you want to make. It is FAR more important to have an effective video than it is to sound casual. Be clear beforehand what you will be showing and communicate that to the viewer within the first ten seconds. Stay on task, follow your outline, and err on the side of conciseness.
Test it out
Take it from someone who spent over four hours just to come out with one six-minute video: test your equipment. It takes 5 or 10 minutes to record a piece, run through the steps, make sure all the necessary files are there, and watch a finished product. This will save you hours! Listen for puffs of air on your “Ps” and “Ts”and adjust the mic accordingly. Make sure that the finished product can be heard clearly and that there are no problems with your powerpoint or the demo software. Produce a video all the way to the end and watch the finished product. Sound problems are the most common issue with on-screen demos and can be very frustrating to someone watching the video. Witha bit of preparation, you can avoid headaches for yourself and your viewers.

Consider screen resolution
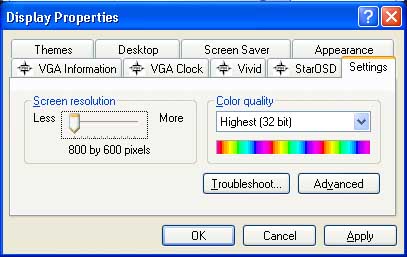
Screen capture video programs let you modify the size of the capture window you are using so if you’re going to shrink the capture size down to a small size, then your resolution is not terribly important. If, however, you’re wanting to capture the entire screen (from, say, a Power Point presentation), you’ll want to modify the size of your screen display (the resolution). To change this in Windows XP, right click on your main desktop window, select Properties, then the Settings tab. Try 800 x 600 first and, if that’s too distracting, then try 1024 x 768. Remember that what it looks like on your screen is different from what it will look like once it is produced. Reducing the screen size will cut down on the raw video file size and make it easier for the program to shrink the size when it is finished.

Turn everything off
Before you start recording, consider EVERYTHING. Is the window open, letting in a lot of noise? Is your IM turned off so you’re not interrupted? Is the background picture on your desktop distracting (or inappropriate)? How about the icons ON your desktop? Is your phone muted? Are there any pop-ups happening? A great way to avoid computer interruptions is to make a new login to your computer and remove everything off of the desktop. In Windows XP, go to Start > Control Panel > User Accounts and create a new user. Then, switch users by going to Start > Logoff and selecting Switch Users, then logging into the new account. Keep this second account “clean” by not installing or logging into any programs that cause interruptions.
Update 8/20:
Smashing Magazine just posted an article about screencasting yesterday… check it out.
< Take Action >
Comment via:
Subscribe via:
< Read More >
Newer
Aug 23, 2008
Josh Can Help updates...
I meant to use this blog as a place to update information about my business and maybe some relevant personal stuff but I’m so boring that all I write about is work and coding!
Older

Aug 15, 2008
Building a homepage from a blog: Part 2: Finalizing the design and planning out mark-up and CSS structure.
After weeks of stressing out in Illustrator, I finally decided on a design I like.